Jumong 3 column Blogger Template

Jumong theme is based on a popular Korean historical drama series. Initially I saw this template on a wordpress blog. It was a wordpress theme. I surfed search engines for a blogger version . But i came to know that jumong template is available only for wordpress,not for blogger . But I am really inspired by this template . So i decided to convert this wordpress jumong 3 column template to blogger beta template. This is my first template . It initially took lot of time , but finally i have converted this jumong wordpress template to blogger. And now I am testing this template on my own blog. I got no errors so far. And also it is tweaked for seo and also this template contains blogger hacks like ,
1. Related Articles
2. Swap Title for SEO
3. Label or Tag cloud
4. faster Loading
5. Meta Tag included , just replace the description and keywords with your own.
6. Bookmarking links for technorati , digg , del.icio.us , blink , etc
How to Add Adsense Ads below post title on blogger :
First check expand widgets template , The search for
How to show Google Adsense Ads only in post pages :
it's very simple , just add this code
put adsense ad code here
Do you want to show the related Posts widget in blogger :
Javascript needed for related posts widget is already added in the template itself , you just need to paste the following code in place you need the widget to appear ,
If you want to add related posts widget below the post content in blogger , then in layout section check expand widgets . Search for
blogger demo : Blogger Plaza
This template is licensed under the Creative Commons Atribution License, so please do not remove the footer credits. I have worked hard to convert this wordpress theme to blogger.
Download Jumong Blogger template
Social Bookmarking widget for blogger
On all Blogger's mind there will be just one question , How to drive traffic to our blog ?
We need to have quality content and backlinks to drive traffic to our blog and occupy first place on google search engines. First one Quality content is in hands of the admin who writes the post. he need to put the main keywords for the article in the post . But for the second one , the author can't just submit each and every post to bookmarking sites . Its very time consuming. But It's a very effective way of driving traffic to our blog. We need a widget for blogger so that visitors/readers can submit our article to bookmarking sites.
This Social bookmarking widget contains Post Link submission to major bookmarking sites like Digg , technorati , Blinklist , Del.icio.us , Furl , Stumble Upon , Reddit , yahoo , Simpy and Spurl .
I hope those are the most famous social bookmarking sites with higher pagerank and traffic .
Just Follow this simple steps to add social bookmarking sites widget to blogger :
Step 1 :
Log in to your Blogger Account and navigate to Layout Section. Then go to Edit HTML Page and check the Expand Widgets box.
Step 2 :
Now search this code :
Step 3 :
Copy and paste the below code immediately below red text.
that's it Now you can see social Bookmarking sites widget to your blog.
I hope you like this widget , see you soon with a new hack . please tell us your suggestion about this widget.

learn how to hide Navigation Bar in Blogger beta - Simple way to hide Navigation Bar
As we all know in blogger, above header there is navbar or navigation bar . Most of want to hide the navigation bar in blogger , but we don't know how to do that. Never wonder here is a simple trick to hide the navigation bar in blogger .
Follow these easy steps to paste the below CSS code :
CSS code to remove Navigation Bar in Blogger :
/* CSS to hid navigation bar */
#navbar
{
height:0px;
visibility:hidden;
display:none
}
Select the tab page Template and then click on Edit HTML
Search for the text : body {
now paste the CSS code above the line in red.
This is how your template HTML code should look after pasting the hack code snippet
That's all. From now onwards your blog will not display navigation bar.

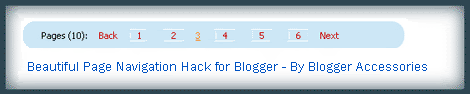
Page Navigation Hack for Blogger
Most said page navigation menu in the bottom of the page can appear only in Wordpress blogs. But Now here is a blogger hack which will help you to show Page Navigation Menu in bottom of the page ( see screenshot ) . you can Add this Page Navigation hack to your blogger template either by inserting script to your template by editing or you can add it as a widget . In this post I will write only how to add this Page navigation menu by editing template code.
I have used a background image for this Page Navigation hack. If you want to show this without the background image just remove the background image url .
Let us start :
Step 1 : Log in to your blogger account and navigate to Layout section. Now go to the edit HTML subtab.
Step 2 : search this line ]]> and add this CSS code above that line.
CSS CODE WITH IMAGE :
.showpageArea {padding: 0 2px;margin-bottom:10px;margin-top:10px;
}
.showpageArea a {border: 1px solid #505050;
color: #000000;font-weight:normal;
padding: 3px 6px !important;
padding: 1px 4px ;margin:0px 4px;
text-decoration: none;
}
.showpageArea a:hover {
font-size:11px;
border: 1px solid #333;
color: #000000;
background-color: #FFFFFF;
}
.showpageNum a {border: 1px solid #505050;
color: #000000;font-weight:normal;
padding: 3px 6px !important;
padding: 1px 4px ;margin:0px 4px;
text-decoration: none;
}
.showpageNum a:hover {
font-size:11px;
border: 1px solid #333;
color: #000000;
background-color: #FFFFFF;
}
.showpagePoint {font-size:11px;
padding: 2px 4px 2px 4px;
margin: 2px;
font-weight: bold;
border: 1px solid #333;
color: #fff;
background-color: #000000;
}
.showpage a:hover {font-size:11px;
border: 1px solid #333;
color: #000000;
background-color: #FFFFFF;
}
.showpageNum a:link,.showpage a:link {
font-size:11px;
padding: 2px 4px 2px 4px;
margin: 2px;
text-decoration: none;
border: 1px solid #0066cc;
color: #0066cc;
background-color: #FFFFFF;}
.showpageNum a:hover {font-size:11px;
border: 1px solid #333;
color: #000000;
background-color: #FFFFFF;
}
It must look like this :
Step 3 : Now search for this code or related in your template ( no need to expand widgets )
Now Add This script just below the .
<script type="text/javascript">
function showpageCount(json) {
var thisUrl = location.href;
var htmlMap = new Array();
var isFirstPage = thisUrl.substring(thisUrl.length-14,thisUrl.length)==".blogspot.com/";
var isLablePage = thisUrl.indexOf("/search/label/")!=-1;
var isPage = thisUrl.indexOf("/search?updated")!=-1;
var thisLable = isLablePage ? thisUrl.substr(thisUrl.indexOf("/search/label/")+14,thisUrl.length) : "";
thisLable = thisLable.indexOf("?")!=-1 ? thisLable.substr(0,thisLable.indexOf("?")) : thisLable;
var thisNum = 1;
var postNum=1;
var itemCount = 0;
var fFlag = 0;
var eFlag = 0;
var html= '';
var upPageHtml ='';
var downPageHtml ='';
var pageCount=5;
var displayPageNum=3;
var firstPageWord = 'First';
var endPageWord = 'Last';
var upPageWord ='Previous';
var downPageWord ='Next';
var labelHtml = '<span class="showpageNum"><a href="/search/label/'+thisLable+'?&max-results='+pageCount+'">';
for(var i=0, post; post = json.feed.entry[i]; i++) {
var timestamp = post.published.$t.substr(0,10);
var title = post.title.$t;
if(isLablePage){
if(title!=''){
if(post.category){
for(var c=0, post_category; post_category = post.category[c]; c++) {
if(encodeURIComponent(post_category.term)==thisLable){
if(itemCount==0 (itemCount % pageCount ==(pageCount-1))){
if(thisUrl.indexOf(timestamp)!=-1 ){
thisNum = postNum;
}
postNum++;
htmlMap[htmlMap.length] = '/search/label/'+thisLable+'?updated-max='+timestamp+'T00%3A00%3A00%2B08%3A00&max-results='+pageCount;
}
}
}
}//end if(post.category){
itemCount++;
}
}else{
if(title!=''){
if(itemCount==0 (itemCount % pageCount ==(pageCount-1))){
if(thisUrl.indexOf(timestamp)!=-1 ){
thisNum = postNum;
}
if(title!='') postNum++;
htmlMap[htmlMap.length] = '/search?updated-max='+timestamp+'T00%3A00%3A00%2B08%3A00&max-results='+pageCount;
}
}
itemCount++;
}
}
for(var p =0;p< htmlMap.length;p++){
if(p>=(thisNum-displayPageNum-1) && p<(thisNum+displayPageNum)){
if(fFlag ==0 && p == thisNum-2){
if(thisNum==2){
if(isLablePage){
upPageHtml = labelHtml + upPageWord +'</a></span>';
}else{
upPageHtml = '<span class="showpage"><a href="/">'+ upPageWord +'</a></span>';
}
}else{
upPageHtml = '<span class="showpage"><a href="'+htmlMap[p]+'">'+ upPageWord +'</a></span>';
}
fFlag++;
}
if(p==(thisNum-1)){
html += ' <span class="showpagePoint"><u>'+thisNum+'</u></span>';
}else{
if(p==0){
if(isLablePage){
html = labelHtml+'1</a></span>';
}else{
html += '<span class="showpageNum"><a href="/">1</a></span>';
}
}else{
html += '<span class="showpageNum"><a href="'+htmlMap[p]+'">'+ (p+1) +' </a></span>';
}
}
if(eFlag ==0 && p == thisNum){
downPageHtml = '<span class="showpage"> <a href="'+htmlMap[p]+'">'+ downPageWord +'</a></span>';
eFlag++;
}
}//end if(p>=(thisNum-displayPageNum-1) && p<(thisNum+displayPageNum)){
}//end for(var p =0;p< htmlMap.length;p++){
if(thisNum>1){
if(!isLablePage){
html = '<span class="showpage"><a href="/">'+ firstPageWord +' </a></span>'+upPageHtml+' '+html +' ';
}else{
html = ''+labelHtml + firstPageWord +' </a></span>'+upPageHtml+' '+html +' ';
}
}
html = '<div class="showpageArea"><span style="font-size:11px;padding: 2px 4px 2px 4px;margin: 2px 2px 2px 2px;color: #000000;border: 1px solid #333; background-color: #FFFFFF;" class="showpage">Page '+thisNum+' of '+(postNum-1)+': </span>'+html;
if(thisNum<(postNum-1)){
html += downPageHtml;
html += '<span class="showpage"><a href="'+htmlMap[htmlMap.length-1]+'"> '+endPageWord+'</a></span>';
}
if(postNum==1) postNum++;
html += '</div>';
if(isPage isFirstPage isLablePage){
var pageArea = document.getElementsByName("pageArea");
var blogPager = document.getElementById("blog-pager");
if(postNum <= 2){
html ='';
}
for(var p =0;p< pageArea.length;p++){
pageArea[p].innerHTML = html;
}
if(pageArea&&pageArea.length>0){
html ='';
}
if(blogPager){
blogPager.innerHTML = html;
}
}
}
</script>
<script src="/feeds/posts/summary?alt=json-in-script&callback=showpageCount&max-results=99999" type="text/javascript"></script>
In the code above you can edit the lines in red to your wish .
1 : var pageCount = 5;
The digit in red represents number of posts to be shown in single page. Change the digit to show as many pages you want.
for example :
In my blog I have put that value as 2 . In each page you can see only 2 posts .
2 : var displayPageNum = 3;
here the digit in red represents number of pages to be listed.
For example :
In my blog I have chosen 3 , then 3 pages will be shown.
That's it now we have added Page Navigation menu hack to our blog successfully 
That CSS code will suit almost all templates. Please don't remove the credit link.
I hope all of you will like this Page Navigation blogger hack . If you have any doubts please ask in comment section . Comments are most welcome , please give me your feedback about this blogger Hack.
You can also add this Page navigation hack in the another method : Widget style.